Paste the link if you don't receive the images/can't access the links.
http://www.marsanomalyresearch.com/evidence-reports/2010/183/life-vs-flipping.htm
Be Well.
David
MARS LIFE vs. IMAGE FLIPPING
Report 183
April 7, 2010
Joseph P. Skipper
J. P. Skipper can be contacted at: jskipper@marsanomalyresearch.com
This report is going to be both about MRO HiRISE biological life evidence that is admittedly difficult to recognize and how just one obfuscation tactic like the flipping of an image strip can seriously and negatively impact the evidence in it. Likewise, the examination of this evidence here will at the same time reveal just how overconfident the secrecy types have become over the decades in what they think you in the public can and can't figure out.
That lack of sufficient respect for you and I is their weakness and where their agenda is vulnerable. The great bulk of this website's work is a story of capitalizing on their mistakes and that weakness and the flaws in the obfuscation that comes from this over confidence. This strip and its evidence is a fairly decent example of that at work.
![]()
http://hirise.lpl.arizona.edu/ESP_012607_0980
The above 1st image is a context view from one side edge of the strip to the other. It is not from one of the big MRO JP2 strips but from the lesser .jpeg "full image (grayscale, non map projected)" strip and presented at only 40% of its original size. I'm using this for some images here rather than sourcing from one of the big JP2 images. Why? Because this is the search strip that most of the scientists and academics will initially use just because it will load reasonably quickly on modern machines and it is vertically straight which is more conducive to scrolling up and down the length of the strip without having to keep compensating for angles.
If the serious researcher sees anything suggestive in the .jpeg strip that encourages closer examination, then they will use the huge file size JP2 strips. The file sizes on these .jpeg strips might be 1-2 MB's (8.3 MB in this case) but a companion JP2 strip might be 500-1000 (343 MB in this case) or more MB's. So one does not hop on the JP2 strips unless one thinks it may pay to do so. Worse, with just a little bit of experimenting, one will find that the JP2 strips often aren't that much more informative than the .jpeg strips. This defies logic and reason but it is never-the-less too often the situation and the cause is often likely intentional obfuscation.
The point is that this vertically straight .jpeg MRO HiRISE strip is usually the one initially viewed. If one doesn't see anything interesting and/or anomalous in this strip, researchers just move on without looking closer in the big JP2 strips. The secrecy agenda is well aware of this and so the .jpeg strip is critical.
Once one understands that, it in turn means that flipping this .jpeg strip vertically from its true original view at official level is often a reality. This obfuscation tactic works better on some evidence than on others. In this strip's case, the effect on the lumpy terrain patterns and also on the spider terrain patterns is pretty severe as you will seen in the images below.
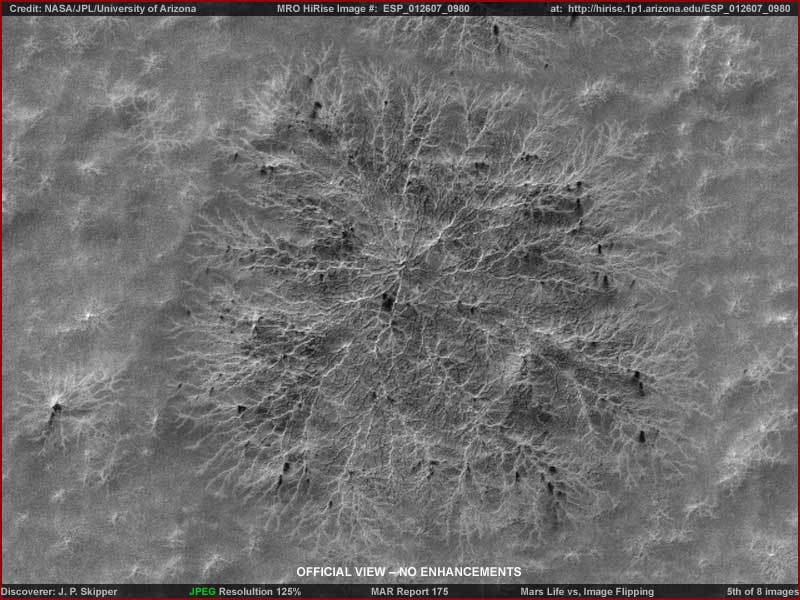
The evidence to be discussed here consists of three different types of evidence appearances. In the above first image there is the smoother lumpy looking evidence in the lower part of the image. Moving up this image there is a dense field of so called "spiders" as per the official name for them and they form a boundary line of sorts with the smoother lump evidence. Above that and not shown is a large field of outright pronounced lumpy looking evidence. I haven't imaged the later here in the context image because the strip is too large and long for that and there just isn't enough image file space for it here.
However, before leaving the above 1st image, although the resolution in it is rather crummy, I want you to look closer at it. Note the view is of a transition between a fairly densely packed field of so called "spider" patterns in the upper part of the image and the smoother but still subtly lump terrain in the lower part of the image. You should know that the radiating spider patterns with peaked ridges along the formations have been officially named and labeled as geological in origin while the smoother and more pronounced lumpy terrain is simply ignored and not labeled.
http://hirise.lpl.arizona.edu/ESP_012607_0980
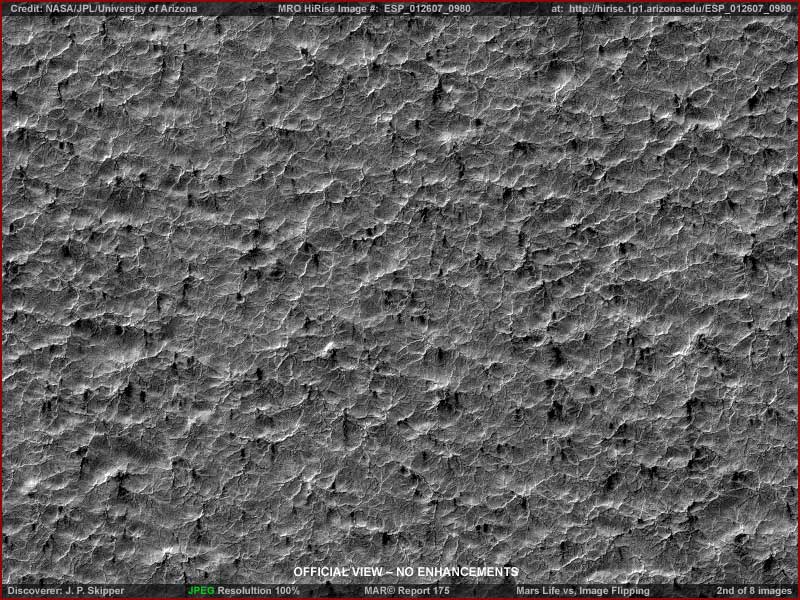
The above 2nd image is of a section at the very end of the strip. It is located beyond the smoother and spider terrain and it represents the official view in the .jpeg strip at 100% of its original size. Probably not but the eye and brain of some viewers may have trouble with these visuals. Some may see a very lumpy surface but most will see a field of many tangled peaked ridges and depressions like wind blown choppy waves in the sea. The reason the eye and brain can have some trouble with this is because the above view is false information causing a inverted look created by the image being flipped at official level.
The truth is that this is a very pronounced lumpy surface consisting of a great many raised and rounded formations. If the brain of the individual has processed visual information before that looks like this as well as knowing what the truth looks like, the brain will tend to swap back and forth undecided between the above flipped inverted look of peaked ridges and basically trying to grasp what is going on. To the brain it looks like peaked ridges but it also knows this is not likely the reality and so there is conflict. Now look what happens in the next image when flipped vertically.
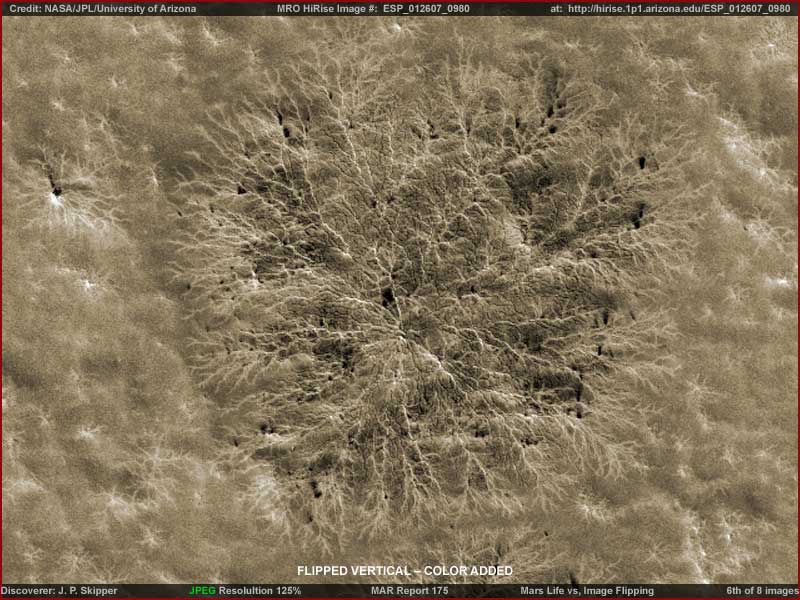
http://hirise.lpl.arizona.edu/ESP_012607_0980
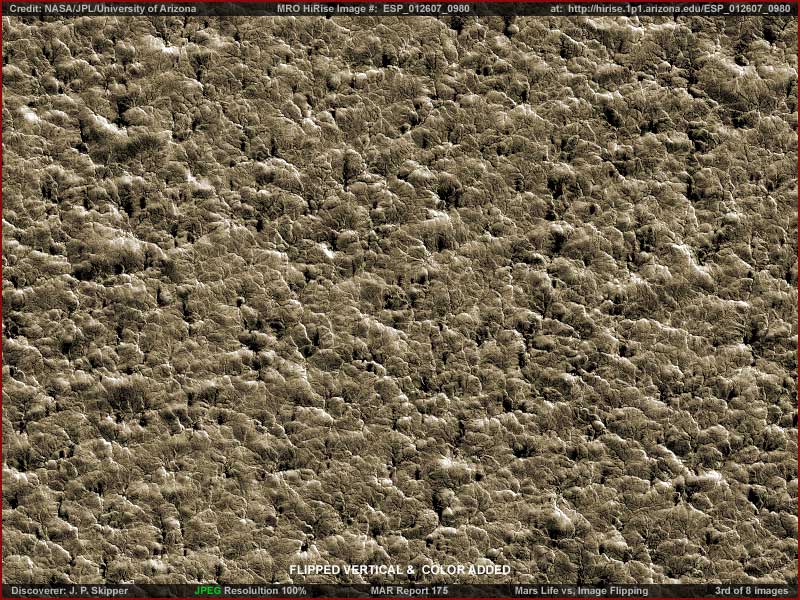
The above 3rd image is the exact same 2nd .jpeg image but now just flipped vertically by me and then with some color and slight clarification work in it. As most of you will be able to see, the change is very pronounced and dramatic. You will not be seeing anything here but pronounced lumpy formation evidence and the brain will have no problem with seeing it because it does represent the visual reality. The next image below provides a closer look at a section of this very same evidence.
http://hirise.lpl.arizona.edu/ESP_012607_0980
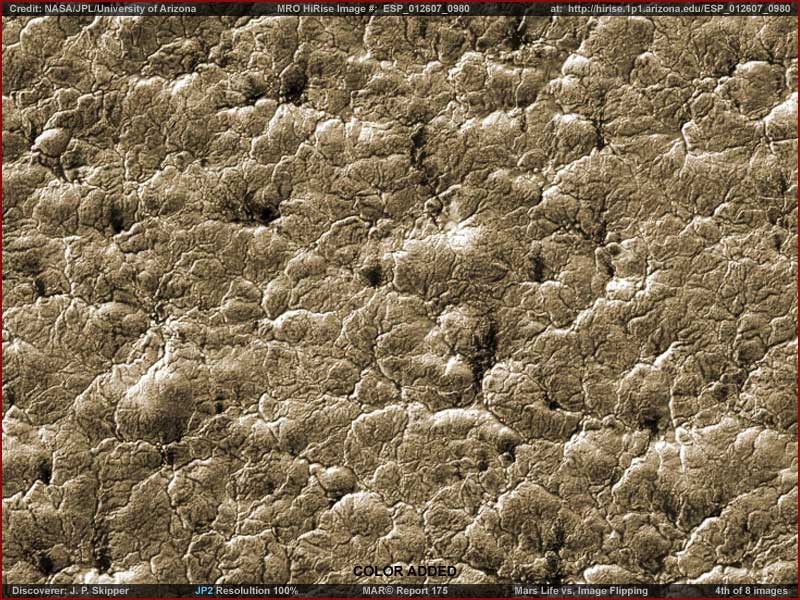
The above 4th image is a JP2 image closer look at the pronounced lumpy evidence. In some ways this rough landscape all looks like a dense field of boulders or worn old volcanic hardened magma material but look again and closer. There is nothing crumbly down there. Note how the seams between the "boulders" are universally fine and ultra close fitting. In fact, they aren't really true gaps between objects or formations at all. Note that nothing here is really casting a shadow either and this would be inevitable in a field of loose boulders no matter how settled, compressed or compacted they might be.
The question is, if not geological rock and soil boulders, then what is this? Since major life forms are not suppose to be possible on Mars, it has to be some form of geology.......right? Now take a look below at the officially so called "spider" formation evidence that you saw in the top of the 1st image but here we'll take a closer look at it. In order to make this better, I've picked out a nice fat more isolated spider formation to focus on rather than try to draw from the confusion of where this evidence is in its dense tangles.
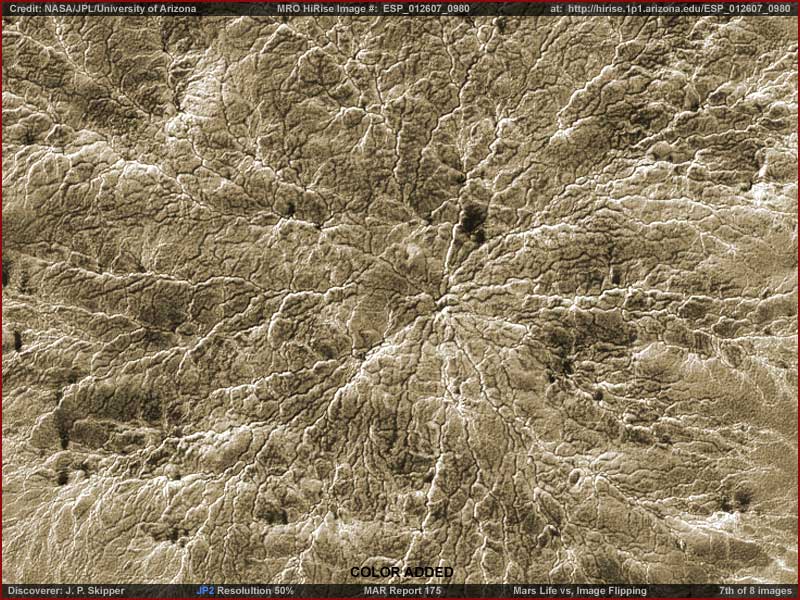
http://hirise.lpl.arizona.edu/ESP_012607_0980
The above 5th image is of an isolated spider extracted from the .jpeg strip and represents the official view. Note that here you can see the unmistakable raised peaked branching's that "spider" out from a central core. This look is why the official consensus opinion has labeled this type of evidence as "spiders."
I might add at this point that there is also the claim by some that this is the same type of colossal plant evidence as found in my May, 2001 Report #019. However, other than the basics of many branching's radiating out from a central core, there are no other similarities with that older Report #019 organic life evidence.
On the other hand, this evidence's particular appearance has also spawned some independent claims that these are the result of lightening strikes into the terrain. It is true that some lightening strikes do leave marks in the terrain at the pont of origin or impact that look similar to the above. The problem with that theory is that it presumes that the above look is real and it isn't. This evidence looks like this because this image strip has been flipped vertically at official level.
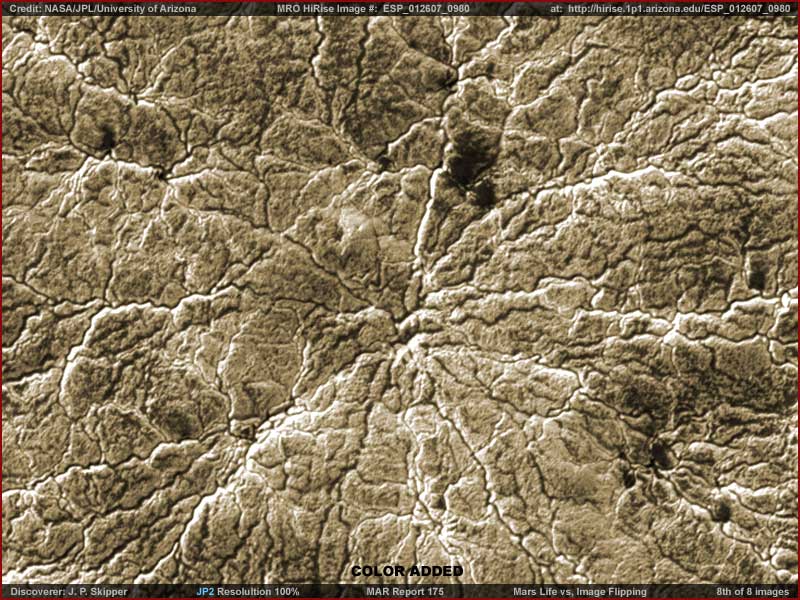
http://hirise.lpl.arizona.edu/ESP_012607_0980
The above 6th image is just simply the 5th image flipped back vertically with a little color added for effect. The change in the evidence is more subtle here than with the pronounced lumpy material but still quite telling. What we are looking at is an eruption point from within a great mass. A great mass that covers this entire landscape that the MRO image strip covers.
Now go back up and take another look at the 1st image here. As you can see, these eruptions can occur as single very large spots like the one above or in great tangled densities as you see distantly in the 1st image. Note the relatively small independent spider patterns radiating out from a central core that can also be seen in the smoother surface areas around in the above 6th image eruption. That indicates that spider formations are not limited to just very large ones.
Now note the smoother but still subtly lumpy surface in the lower half of the 1st image and then the exaggerated lumpy surface in the third and fourth images. These are the multiple changing looks of an immense mold like organism that covers broad areas of terrain and this MRO image catches only a small slice of it.
Fortunately, what this strip does do though is demonstrate the various basic looks of this organism. First is the relatively smooth surface with subtle residual lumps visually printing through from underneath, then come the eruptions, and then the eruption areas begin to settle back down to the exaggerated lumpy conditions on their way to returning to have the smoother surface look. Before it finally settles back down to the smoother look, the disrupted surface retains the pronounced lumpy look to varying degrees.
http://hirise.lpl.arizona.edu/ESP_012607_0980
http://hirise.lpl.arizona.edu/ESP_012607_0980
When this stage is completed, this leaves the eruption area visually less organized looking with respect to a central point of origin. As the centered eruption area begins to settle down and subside, it goes through the phase of visually looking like the pronounced lumpy evidence in the 3rd and 4th images. It eventually returns to the smoother surface look you see in the lower half of the 1st image and remains with that basic look until it is compelled to erupt again a future reproductive cycle.
As the reproductive eruption stage begins, the mass pushes upward and outward from the central point making way for the reproductive process coming up from below. This rapid change causes expansion stresses in the mass but the mass is cohesive and the many branching's are simply relief seams forming at random in the most stressed locations to relieve the tearing apart expansion pressure. The center area that bulged up is the first to retire back down below into the mass and therefore the first to visually disappear from the surface. This leaves the outer eruptive areas (images 3 and 4) with the pronounced lumpy look to gradually sink or subside back down into the mass to eventually obtain the smoother surface look.
So I suspect that we are looking at some kind of colossal colony mold growth here on Mars. As some of you know, I have reported before on colony life on Mars. For example, take a look here in January, 2007 Report 114; June, 2001 Report #021; March, 2005 Report #085; July, 2006 Report 105; December, 2006 Report #110; and July, 2007 Report #122. As you examine the material in the older reports, you'll note that some of this other colony life is confined to colonies that maintain isolation one from another but still close proximity while others like the evidence in this report appear to operate within a continuous mass.
The point being that colony life on Mars is alive and well, in variety suggesting long evolutionary times, and involves colossal size forms that can even be seen in the poor satellite imaging data as released to us. It does not dominate the planet surface but is just another major part of the planet's surface eco-systems along with more conventional plant life.
However, there is a general difference between the Mars colony life and plant life. Most of the Mars vegetation plant species seem to require the presence of sufficient surface water along with plenty of available soil but not too much water and that is very much like here on Earth. On the other hand, most of the huge size Mars colony/spore life like that seen here seems to require sustained shallow surface water presence in the broad areas that the colony life flourishes on. This of course differs from here on Earth where vegetation plant life clearly dominates, at least in the current course of Earth's history.
I also want to bring another issue to your attention here. Take a look at the last 8th image above. Note how close the camera view is of the evidence and it's at just regular 100% resolution with no zoom factor in this big JP2 image. This kind of clarity is in part due to the "spider" evidence being so colossal in size overcoming resolution problems but it's also because this JP2 image has not been subjected to very much in the way of obfuscation tactics and that is rare. Their opinion is that, as long as it looks fairly close to geology, you and I are too stupid to figure out that it is actually life just unfamiliar to the Earth human eye.
This demonstrates just how good unobfuscated MRO HiRISE JP2 imaging can be when left reasonably alone and not obfuscated so much. Imagine what someone else is seeing in secrecy with respect to anomalous Mars evidence like this and in true color instead of this black and white junk we get. It's a clue as to where your tax dollars are going.
Most MRO HiRISE JP2 images are heavily obfuscated but not this particular JP2 image so much. Why? I suspect it is due to the nature of the material as well as because they were too over confident and dependent on the single dimensional flipping obfuscation in the quick loading vertically straight .jpeg image to cause researchers to not find much of interest here and move on rather than go to this particular JP2 image 343 MB file size where a bit more can be determined.
As I stated at the beginning of this report, it is that over confidence, arrogance, and insufficient respect for our mental acuity out here in the great unwashed public mass that is their vulnerability. It reveals them, their agenda, their flaws, and their mendacity.
Joseph P. Skipper, Investigator


No comments:
Post a Comment